
如何制作自己的播客
来自 Appetite For Production 音乐技术播客的 James Russell 向我们展示了初学者如何开始播客,以及如何使用基本的工具开始播客。
James Russell, from the Appetite For Production music technology podcast, shows us how beginners can turn their hand to podcasting, and how to use basic tools to get started.
当苹果的 iPod 和 iTunes 在 00 年代中期开始流行的时候,播客还只是一种边缘化的地下媒体形式。很少人会去听这种 “DIY 电台”,甚至更少人会去做这种电台。不过随着时间的推移,互联网的普及和社交媒体(Youtube,音乐流媒体及智能手机),使播客这种形式和普通人的距离越来越近。
When it started its rise to popularity with Apple’s iPod and iTunes in the mid-00s, podcasting was something of a fringe underground form of media. Few people listened to these ‘DIY radio’ shows, and even fewer made them. But as time passed, the spread of the internet – and with it, social media, YouTube, music streaming and smartphones – brought podcasting closer and closer to the average pair of ears.
创建一个播客其实不难。您只需拥有基本的录音和编辑设备,就可以简单而快速的创建自己的节目,通过这篇指南,您将了解如何更好地使用这些工具来提高音频质量。使用我们的 KOMPLETE AUDIO 声卡,您不仅可以获得更好听,更专业的录音信号路径,而且您还能得到一套免费的软件,包括 Ableton Live Lite、SOLID BUS COMP 压缩插件,以及两个月的 Sounds.com 免费订阅,这些东西会帮助您录制,编辑及生成您的播客。
It’s not hard to create a podcast. With basic recording and editing tools, you can quickly and easily create your own shows, and with this guide you will discover how to work with those tools better to increase audio quality. Using our KOMPLETE AUDIO interfaces, you don’t just get a better-sounding, more professional recording signal path – you also get a whole package of free software, including Ableton Live Lite, SOLID BUS COMP, and two months of free subscription to Sounds.com to help you record, edit and produce your work.
不过,录音和制作只是成功的一半 – 您还需要考虑播客分发和推广的秘密诀窍,让您的播客能够被世界听到。
But recording and production is only half the battle – you’ll also need to consider the dark art of podcast distribution and promotion to get your podcast out into the world.
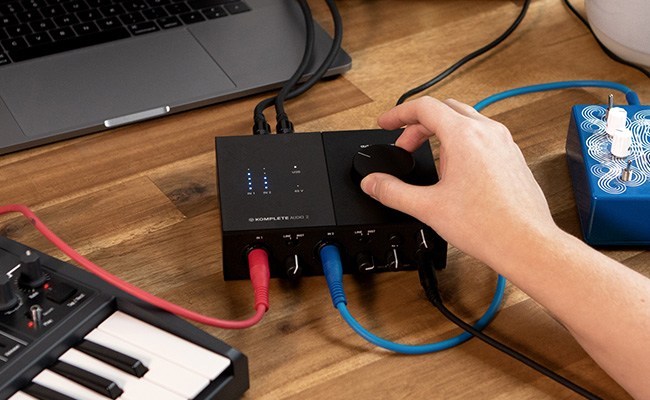
您的录音设备
我们都知道使用内置的扬声器就能简单地听到音频信号,不过在音频编辑的时候,耳机能够更好地捕捉到更多的细节。但是,在录制方面,您应该选择适合自己的最好的方案。
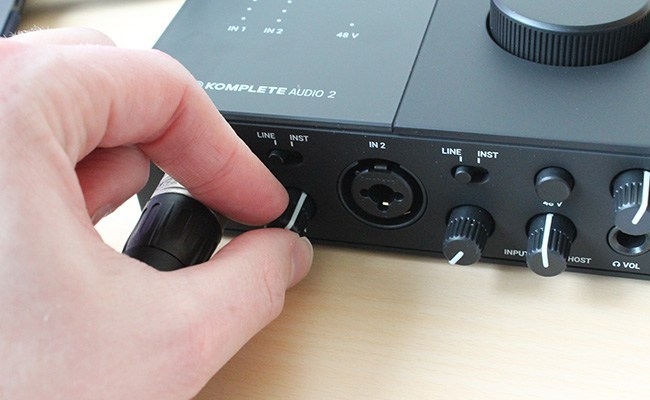
使用我们的 KOMPLETE AUDIO 声卡的话,您会得到高清的录制品质(24-bit,192kHz),USB 供电,以及使您的音频梦想成为现实所需的所有软件。通过声卡上的 XLR 卡农输入插孔,您可以使用专业的话筒来接收音频信号。剩下的问题就是选择话筒了。
YOUR RECORDING SETUP
We all know that listening to an audio signal is simple using built-in speakers, although as we’ll see later, headphones are better for catching the finer details while editing. When it comes to recording, though, getting the right solution is a great investment.
With our KOMPLETE AUDIO interfaces, you get high-resolution 24-bit, 192kHz recording that’s powered via USB and all the software you need to make your audio dreams a reality. With one (KOMPLETE AUDIO 1) or two (KOMPLETE AUDIO 2) XLR input ports, you can get signals from professional microphones into your computer. The only problem then is selecting a microphone.
选择话筒
CHOOSING A MICROPHONE
好的录音离不开可靠的话筒,因此您需要确保自己拥有一个值得信赖的话筒。USB 话筒是可以使用的,但这些话筒的可靠性较低,同时许多制造商通过降低质量来降低成本。同样地,领夹式话筒可能更加适合视频工作,但是好的领夹式话筒的价钱也不便宜。
A trusty microphone is the source of any good recording, and so naturally, you need to be sure you have one that you can trust. USB microphones are available, but these are less hard-wearing, and many manufacturers cut the cost by cutting quality. Similarly, lapel mics (a.k.a. lavalier mics) may be good for video work, but getting a good one can cost.
多数歌手会选择经典的舒尔 SM58 话筒有以下几个原因:首先它非常耐用;此外它是指向式话筒(意味着来自两侧的声音不会混入直接朝向前方的声音),而且相对于电容话筒来说,SM58 是相对便宜的。
The classic Shure SM58 (€98) is the choice of singers the world over for a few reasons: it’s durable, it’s directional (meaning that sound coming from the sides won’t bleed into sound coming directly towards the front), and it’s relatively cheap compared to the Condenser variety.
电容话筒是以不同的方式接收声音的:它是用带电振膜把声音转换成电信号,所以它需要 48V 的幻象电源,即使只用电脑 USB 接口供电,KOMPLETE AUDIO 也支持 48V 幻象电源。AKG C-5 和 Rode M2 是比较流行的电容话筒选择。
A condenser microphone detects sound in a different way, using charged plates to translate sound into an electrical signal. This means it needs 48V of phantom power, which can be supplied by KOMPLETE AUDIO interfaces, even when powered only by a computer. Popular condenser microphones include the AKG C-5 (€129) and the Rode M2 (€79)
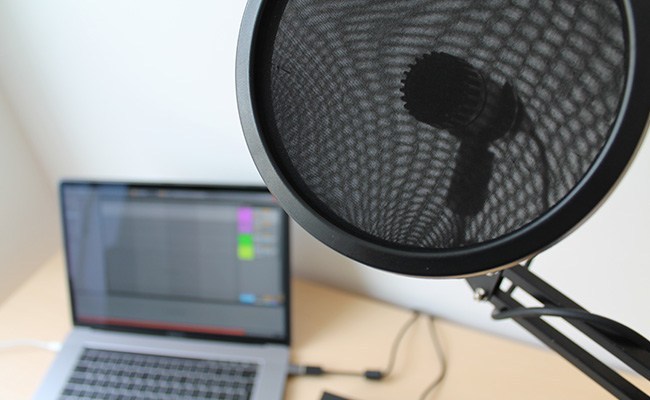
其他的录制用配件
OTHER RECORDING ACCESSORIES
根据您想要录制的播客类型,有时只有一个话筒可以用是不够的,自然您会想要一个话筒架(大多数话筒都会附送对应的话筒夹,让您夹到话筒架上),一根连接话筒和声卡的 XLR 卡农线,还有一个放置在话筒前面的防喷罩,去减少录制时的喷音现象。
Depending on the type of podcast you want to record, simply having a microphone at your disposal won’t always be enough. Naturally, you’ll probably wish to have a stand (most microphones will come with a clip to connect to it), an XLR cable to connect the signal from the mic to the audio interface, and a pop shield, to place in front of the microphone to reduce any ‘plosive’ popping sounds.
您的软件设置
YOUR SOFTWARE SETUP
当然,如果没有合适的软件,优质的录制和编辑将无法实现,KOMPLETE AUDIO 1 和 KOMPLETE AUDIO 2 声卡有着您所需要的关于音频的一切。
Recording and editing would be nothing without the appropriate software, of course, and KOMPLETE AUDIO 1 and 2 interfaces come with everything you’ll need to commit your words to audio.
通过随附的 Ableton Live Lite 序列码,您会拥有一个完整的虚拟工作室,以用于录制和编辑多个音频轨道,及将完成的项目导出为 WAV 或 MP3 文件以便之后上传的功能。
With the included serial for Ableton Live Lite, you have a complete virtual studio for recording and editing multiple tracks of audio, as well as exporting the finished project as a WAV or MP3 file to send out into the world.
KOMPLETE AUDIO 系列还配备了 20 多种用于制作精彩音乐的软件乐器和效果,但特别适合编辑播客的一款插件是 SOLID BUS COMP 和 SUPERCHARGER 这两款压缩器,它们可以调整您录制的话筒信号的动态。
The KOMPLETE AUDIO range also comes with over 20 software instruments and effects for making great music, but of special interest for podcast editing will be SOLID BUS COMP and SUPERCHARGER, which can wrangle the dynamics of your recorded microphone signals.
两个月的 Sounds.com 免费订阅意味着您可以选择数百万个音频采样自由使用,即使订阅过期,您之前所选择下载的采样仍可免版税继续使用。
The included two-month subscription to Sounds.com means that you can choose from millions of samples, and continue to use what you’ve chosen, royalty-free, from that moment on.
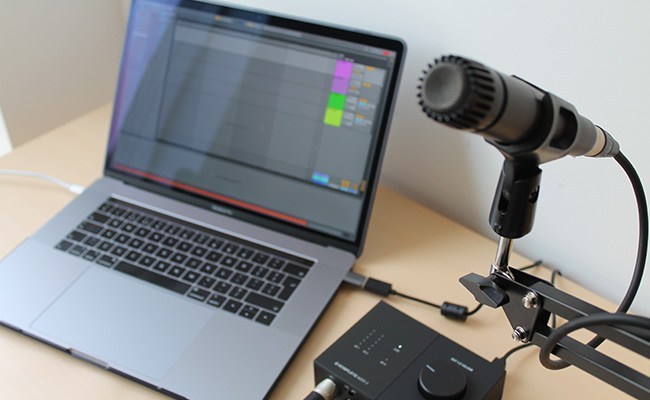
获得输入信号并录制
GETTING AN INPUT SIGNAL AND RECORDING IT
除非您很幸运,否则获得好的录音并不简单。专业录音室的建造和使用是有原因的(考虑到良好的声学效果),但您也可以在普通的房间内获得类似的效果。
Unless you’re lucky, getting a good recording won’t be a simple matter of point and shoot. Professional studios are built and used for a reason, with good acoustics in mind, but you can get far closer within a normal room.
首先,第一个问题就是您要确定话筒能接收到信号,而且通过声卡输入到电脑中。随着一切连接完成,而且 Ableton Live Lite 也安装了,让我们开始吧。
The first hurdle to jump is making sure you can actually get a signal from your microphone, via your interface, into your computer. With everything connected, and Ableton Live Lite installed, let’s make it happen.
运行 Ableton Live Lite 后,去到 Preferences(首选项)。在 Audio(音频)栏中,您可以选择您的 KOMPLETE AUDIO 作为输入/输出设备,选择它作为输入设备则会将您的话筒信号输入到 Ableton,选择它作为输出设备,则 Ableton 软件的输出信号会通过声卡背面的音频插孔及前面板的耳机插孔输出。
Launch Live and head to its Preferences. In the Audio tab, you can choose your KOMPLETE AUDIO as the Input and/or Output device. Choosing it as the Input device will route your microphone to Ableton as an Input. Choosing it as the Output device means that Ableton’s output will leave through its back-panel audio ports and its front-panel headphone jack.
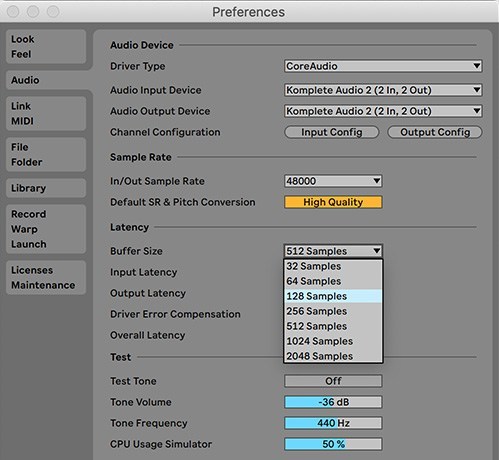
在同一个面板中,为了防止回放录音时出现延迟,请把缓冲区大小设定为 128 Sample。
In the same panel, change the Buffer Size to 128 Samples so there’s not much delay in the signal playing back as you record.
可以使用键盘上的 Tab 键切换到 Ableton Live Lite 的 Arrangement Mode 时间线模式,然后点亮录制按钮(就在“S”独听按钮旁边,下面有展示)即可录制音频频道上的信号(注意并不是 MIDI频道)。在接口输入上,您可以选择 1 号接口(AUDIO 2 左边的接口),或者 2 号接口(右边的接口),或者 1/2 接口(两个都选择)。这个操作并不会开始录制,但是会保证当您需要录制的时候,轨道是启用的。如果这时候您想通过耳机或者扬声器听到输入的声音(监听),只需激活轨道上的“输入”按钮。不过在录制的时候您可能会想关闭监听的功能。
Switch over to Ableton Live Lite’s Arrangement View using the Tab key on your QWERTY keyboard, and record arm one of the Audio channels (not a MIDI channel) by activating its record light (next to the S solo button, as shown below). Under Ext. In, you might be able to choose either port 1 (the left-hand port on AUDIO 2), port 2 (the right-hand port) or 1/2 (both). This won’t start recording, but rather make sure the track is active when you do record. If you want to hear the input through your headphones or speakers at this point, activate the track’s In button. You may want to switch this to Off when actually recording.
您可以在 Ableton Live Lite 界面的顶端按录制按钮来进行测试。然后按空格键来停止录制,再次按空格键以回放,确认您能够听到测试的录音。
You can hit Record at the top of Ableton Live Lite’s interface in order to do a test recording. Stop recording with the spacebar, and use the spacebar again to play it back and make sure you can hear the test.
设置电平及录制
SETTING THE LEVELS AND RECORDING
您需要查看轨道的灰色电平表以获得最好的结果。当轨道上的“输入”按钮被激活时,播放时会有绿色电平值显示。当您录制时,往话筒输入最大的声音,如果电平表有红色电平值显示,则表示信号太大声了,这时候,您就需要使用 KOMPLETE AUDIO 前面板上的旋钮来调低话筒的输入音量,然后再次测试。最理想的情况是,您设置的最大声音量会接近接近红色电平值,但还没到。
For the best results, watch the gray level meters in the track’s display. These will be green when playing back the track or when its In button is activated. Make the loudest sound into the microphone that you expect to make during the recording – if the meter goes red, the signal is too loud. When this happens, turn the microphone’s signal down using the knob on the KOMPLETE AUDIO’s front panel, and test again. Ideally, the level will be set so that the loudest sounds you make will nearly push into the red, but never quite get there.
当输入信号能在电平表显示的时候,您可以在 Ableton Live Lite 的顶部按红色的录制按钮,这样子就会开始录制,录制的片段就会实时显示在时间轴上。您可以在任何时候按录制按钮来停止/重新开始录 制。但需要记住,您的播放进度条在时间轴的哪里,录制就会在哪里开始(跟编排视窗顶端的箭头连接的一条亮蓝色的垂直线)
With audio coming through the meters, press the red Record circle at the top of Ableton Live Lite, and your recording will start. The recorded clip will appear in the timeline as it happens. You can stop recording at any time to finish, and restart using the same Record button again. Remember, the recording will start from wherever your Playhead is placed in the timeline (the thin, light-blue vertical line matching the arrow at the top of the arrangement view.)
编辑技巧
EDITING TECHNIQUES
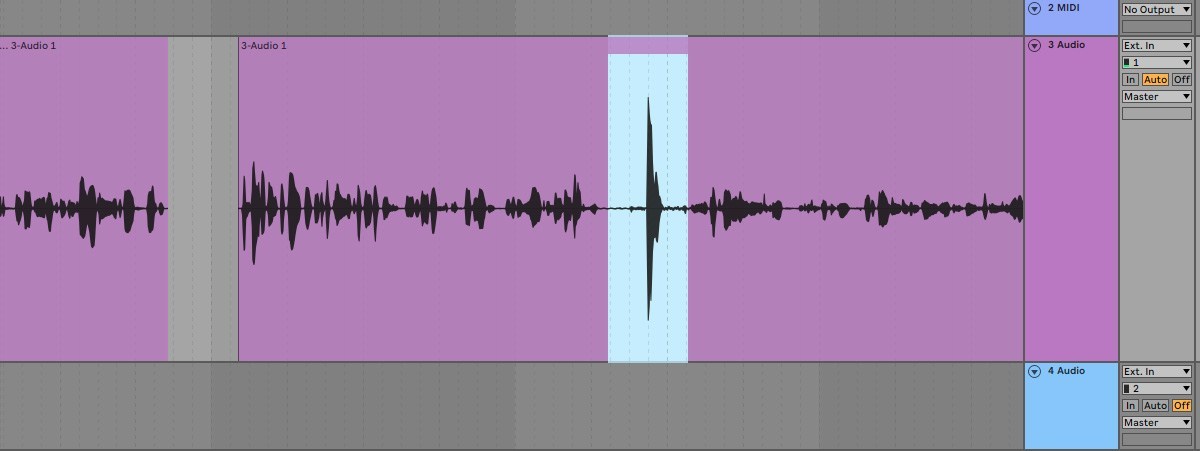
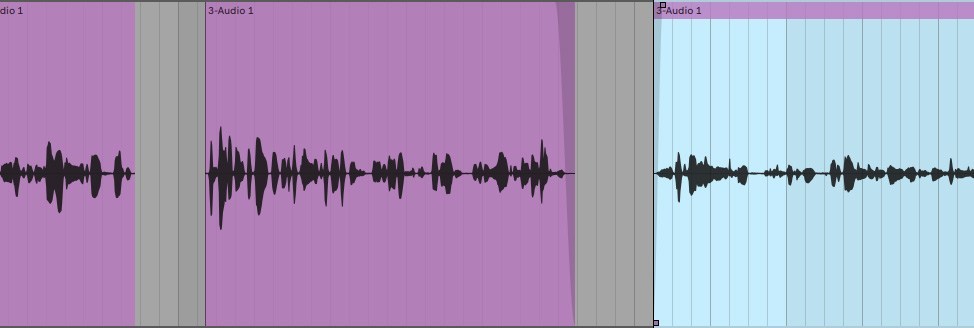
使用 Ableton Live Lite 的音频编辑工具,您能够在时间轴上任意剪切,复制和移动音频片段。首先我们可以使用快捷键来取消自动对齐到网格线(PC:Ctrl+4;Mac:Cmd+4),这样的话指针就不会对齐到拍子和小节上了。
Using Ableton Live Lite’s audio editing tools, you can start to chop, slice and move your audio signals on the timeline. Start by disabling Snap To Grid using Ctrl/Cmd-4, so that your cursor positions aren’t snapped to beats and bars.
您能够增加音频轨道的面积让它们更加容易操作,或者使用鼠标点击导航条上下拉动以放大或缩小音频轨道(导航条就在播放按钮和录制按钮下面)
You can increase the size of the audio tracks so they’re easier to work with, or zoom in and out of the timeline by clicking and dragging up/down on the navigation bar just below the play and record buttons.
如需选取音频片段的某部分,只需点击片段的下半部分,然后从左向右拉取就可以了,然后可以按 Delete 键来删除这部分的音频,也可以点击音频片段的左上角或右上角来移除录音的前端和后端,点着音频片段的标题栏就可以把录音前后移动了。
Select a region within the audio clip by clicking in the bottom half and dragging left or right, use the Delete key to remove that portion of audio, and remove the starts or ends of recordings by dragging from the upper left or right edges of an audio clip. Drag on a clip’s title bar to move it earlier or later in time.
音效,主题音乐及导出您的博客
STINGS, THEMES AND EXPORTING YOUR PODCAST
没有主题音乐和音效的播客不能叫做播客,您可以使用 KOMPLETE AUDIO 1 和KOMPLETE AUDIO 2 的附赠软件,或者使用免费的 KOMPLETE START 软件包里面的乐器来创建整轨的音频(例如 MONARK, TRK-01 BASS, MIKRO PRISM, 和 Carbon 2)
Where would a podcast be without theme music and stings between sections? Using the software that comes with KOMPLETE AUDIO 1and KOMPLETE AUDIO 2, or with the free KOMPLETE STARTpackage, you get can create entire tracks with software instruments like MONARK, TRK-01 BASS, MIKRO PRISM, and Carbon 2.
附带的 Sounds.com 两个月订阅,您能从 Sounds.com 得到大量的热门歌曲以及音效,从这里下载的音乐就是您自己的了,而且可以无限制使用(无需版税)
With the included Sounds.com two-month subscription, you get plenty of credits to find inspiring stings and hits in the Sounds browser, and everything downloaded from here is yours to keep and use in your music, royalty-free.
导出及上传
EXPORTING AND UPLOADING
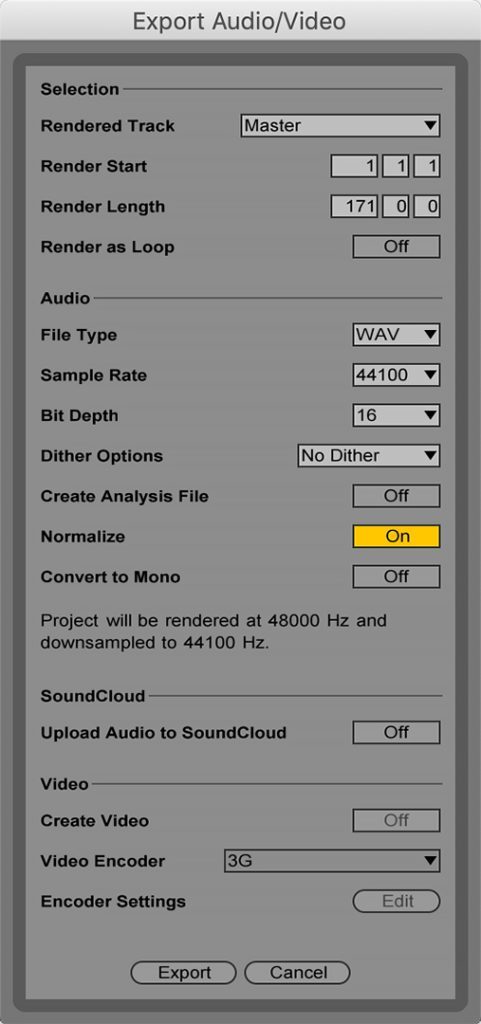
当您的项目完成后,打开 Ableton Live Lite 的文件菜单,然后选择导出。为了能渲染正确长度的音频文件,您首先需要在时间轴上选择好。以下是推荐的导出设定,为了更小的文件体积,您可以选择导出 MP3 文件而不是 WAV 文件。
With your project completed, head to Ableton Live Lite’s File menu and choose Export. To render the correct length audio file, you might need to select it first in the timeline. The Export settings shown below are recommended, but for smaller file sizes, you can create an MP3 file instead of a WAV file.
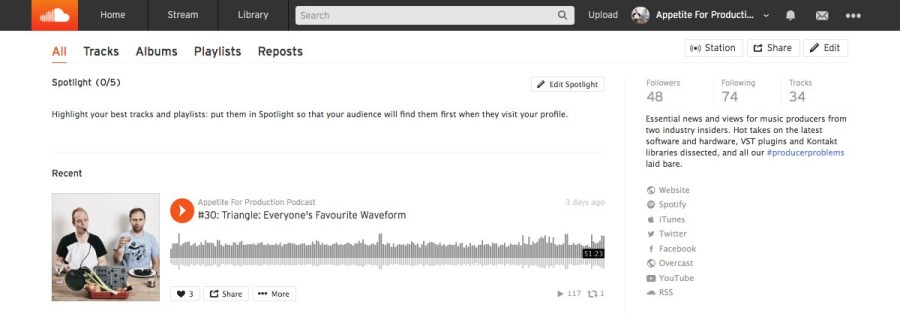
播客使用基于 RSS 的格式进行分发。简单来说,如果您的博客或者网站拥有 RSS ,而且 RSS 的每个条目都有音频文件的话,就可以作为播客提交到 iTunes Podcast。同时您可以使用自助建站服务来创建您的播客,也可以使用 Soundcloud 这类的服务,让您可以免费上传文件,而且无须担心太多技术性问题。
Podcasts are distributed using a format built on RSS. Simply put, if you have a blog or website with an RSS feed, and that RSS feed contains an audio file in each entry, it can be submitted to iTunes as a podcast. While you can host your podcast using a website builder, services like SoundCloud let you upload files for free and handle a lot of technical jobs.
如果没有订阅 SoundCloud ,您只能上传总共 180 分钟的音频。其他的播客服务分别是 Blubrry(最少 12 美金/月);BuzzSprout (最少 12 美金/月);PodBean(最少 9 美金/月)。
SoundCloud will only let you upload up to 180 minutes of total content without a subscription plan. Other podcast-hosting services include Blubrry for at least US $12/month, BuzzSprout for at least $12/month and PodBean costing at least $9/month.
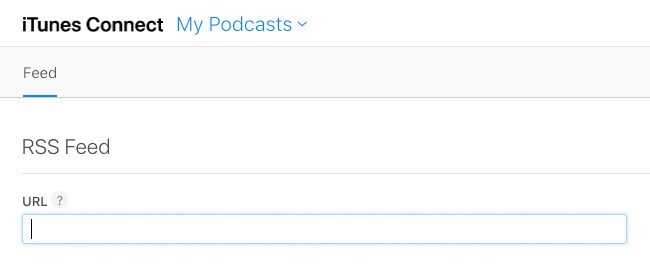
让您的播客正式上线
播客的分发并不总是显眼的,而且现在大多数托管平台也会帮您完成分发流程,不过对于大多数的人来说,他们需要把他们的播客正式提交到 iTunes 才能变成“真”的播客。您可以使用 Apple ID在 Apple 的 Podcast Connect 网站完成。一旦您的播客在 Apple 的目录中出现,它就会扩散到其他人了。
MAKING YOUR PODCAST OFFICIAL
Podcast distribution isn’t always an obvious task, and while most hosting platforms will do this process for you, many people will need to officially submit their podcast to iTunes before being seen as ‘real’. This can be done at Apple’s Podcasts Connect site using an Apple ID. Once your podcast’s in Apple’s catalog, it will also proliferate to many others.
还有其他的播客分发方式,包括 Spotify,Stitcher 和 Google Play。播客是一个长期的工程,当您的播客正式上线后,您的旅程才刚刚开始。
Other distribution lists to get your podcast onto include Spotify, Stitcher, and Google Play.
Podcasts are a long-term project, so once yours is official, the journey has just begun.
关于作者
James Russell 是 Appetite For Production 播客的联合主持, 两周一次,主要介绍音乐技术,最新最好的插件,和作为音乐制作人如何在行业中生存。
ABOUT THE AUTHOR
James Russell is the co-host of Appetite For Production podcast, a fortnightly show all about music technology, the latest and greatest plugins, and how to survive in the world as a music producer.